In-app chat

Support inside your app, without an SDK

One URL in a WebView. No package to install, no build to break, and every conversation lands in the same inbox as the rest of your support.

01 · What it is
The short answer

In-app chat in inrelay is a hosted chat page at your own help-center address. Point a WebView at /chat and your iOS, Android or React Native app has live chat, AI answers and your help articles inside it — with no SDK, no dependency and no app-store release to change anything.

The page is the same chat your website visitors use, served full-screen instead of in a bubble. That means it inherits everything you have already set up: your brand and accent, your business hours, the AI chatbot and its knowledge, the lead form, and the inbox your team already works in. Turning it on is not a project — the address exists as soon as live chat is on.

It is included on every plan. There is no mobile add-on, no per-conversation fee, and nothing to buy before you can try it.

02 · Your address

One URL, three optional details

Your chat page lives at /chat on your help-center address — the custom domain if you have connected one, otherwise the .inrelay.support address you claimed. You will find the exact URL, ready to copy, in Settings → Help Widget → In your mobile app.

https://support.yourbrand.com/chat

That URL on its own is a complete integration: a visitor can chat anonymously, and the conversation follows them between app launches on that device. If your app knows who the user is, you can say so with three query parameters — all optional, all safe to leave out:

  • token_id — your own opaque, random identifier for this user. It is what restores their conversation on a new device or after a reinstall.
  • email — so a reply can reach them when the app is closed.
  • name — so your team knows who they are helping.
https://support.yourbrand.com/chat?token_id=8f2c…&email=ada%40example.com&name=Ada%20Lovelace

URL-encode the values. Unless you turn on verified identity (below), treat token_id as a secret: whoever holds one can resume that conversation, so generate long random values — never an email address, a username or a sequential id.

03 · The recipes

Three ways to open it

Each of these is the whole integration. The two settings that matter on every platform are JavaScript and DOM storage — DOM storage is what keeps a visitor’s conversation across app launches.

iOS — WKWebView

import UIKit
import WebKit

final class SupportViewController: UIViewController {
  private let webView = WKWebView(frame: .zero, configuration: WKWebViewConfiguration())

  override func viewDidLoad() {
    super.viewDidLoad()
    webView.frame = view.bounds
    webView.autoresizingMask = [.flexibleWidth, .flexibleHeight]
    webView.scrollView.bounces = false
    view.addSubview(webView)

    var url = URLComponents(string: "https://support.yourbrand.com/chat")!
    url.queryItems = [
      URLQueryItem(name: "token_id", value: user.supportToken),
      URLQueryItem(name: "email", value: user.email),
      URLQueryItem(name: "name", value: user.fullName)
    ]
    webView.load(URLRequest(url: url.url!))
  }
}

Android — WebView

class SupportActivity : AppCompatActivity() {
  override fun onCreate(savedInstanceState: Bundle?) {
    super.onCreate(savedInstanceState)
    val webView = WebView(this)
    setContentView(webView)

    webView.settings.javaScriptEnabled = true
    webView.settings.domStorageEnabled = true   // keeps the conversation across launches
    webView.webViewClient = WebViewClient()     // keep navigation inside the WebView

    val url = Uri.parse("https://support.yourbrand.com/chat")
      .buildUpon()
      .appendQueryParameter("token_id", user.supportToken)
      .appendQueryParameter("email", user.email)
      .appendQueryParameter("name", user.fullName)
      .build()
    webView.loadUrl(url.toString())
  }
}

React Native — react-native-webview

import { SafeAreaView } from 'react-native'
import { WebView } from 'react-native-webview'

const params = new URLSearchParams({
  token_id: user.supportToken,
  email: user.email,
  name: user.fullName
})

export function SupportScreen() {
  return (
    <SafeAreaView style={{ flex: 1 }}>
      <WebView
        source={{ uri: `https://support.yourbrand.com/chat?${params}` }}
        javaScriptEnabled
        domStorageEnabled
        originWhitelist={['https://support.yourbrand.com/*']}
      />
    </SafeAreaView>
  )
}

Give the WebView the full screen and let it handle its own scrolling — the page is already sized for a phone, including the safe area at the bottom.

Pin the allowlist to your own address, with the trailing slash. A pattern like https://* lets any site render inside your support screen, and one without the slash — https://support.yourbrand.com* — also matches support.yourbrand.com.example.net. If you check the URL yourself as well, compare the parsed origin rather than testing a prefix.

04 · Verified identity

Prove it is really them

Optional, off by default, and a toggle rather than a migration: every workspace already has a signing secret waiting in Settings → Help Widget.
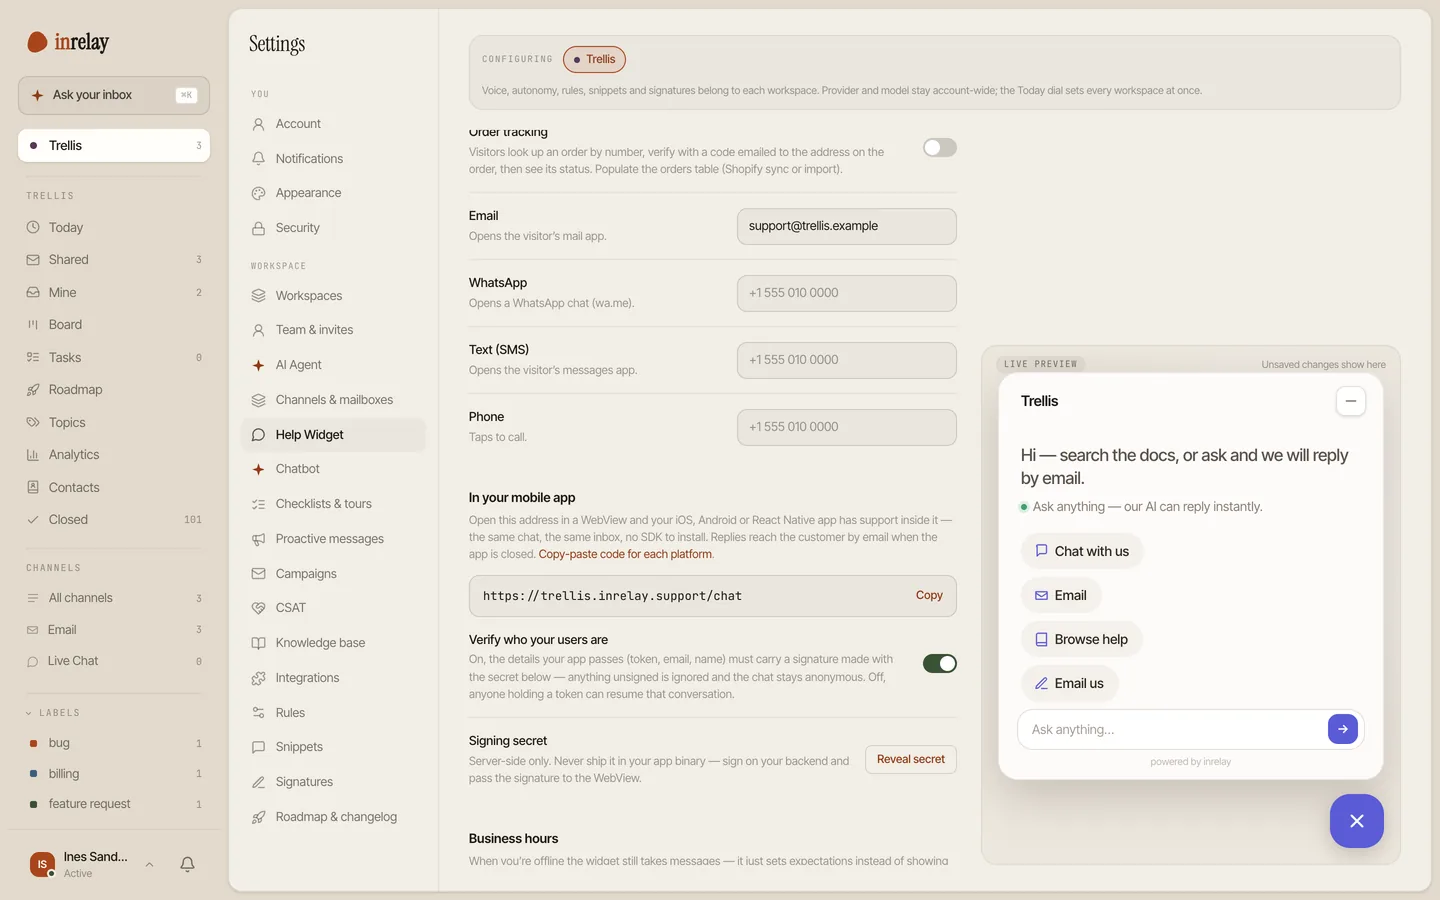
The In your mobile app settings block with the verification toggle

With verification on, the details your app passes must arrive with a signature your server made. Anything unsigned — or signed for a different user — is ignored: the chat still opens, it is simply anonymous. It never fails hard, because a support screen that will not load is worse than one that does not know your name.

Sign this exact string, joining the three values with newlines and using an empty string for anything you leave out:

token_id + "\n" + email + "\n" + name
// on your server, never in the app binary
import { createHmac } from 'node:crypto'

const payload = [tokenId, email ?? '', name ?? ''].join('\n')
const signature = createHmac('sha256', INRELAY_EMBED_SECRET)
  .update(payload)
  .digest('hex')

Append it as &signature=…. Sign the values exactly as you put them in the URL — no trimming, no lowercasing — and sign all three: a signature covering only the token will not validate a request whose email differs. Values containing line breaks are refused.

  • The secret lives on your server and is read by ours. It never belongs in your app binary, where anyone can extract it.
  • Fetch the signature from your own authenticated endpoint when the user opens support, then build the URL.
  • Turn verification on before you ship, if you are going to. Retrofitting it after your users are already chatting means reissuing every token.
05 · When the app is closed

Replies reach them by email

Someone asks a question, closes your app, and your team answers ten minutes later. The reply is emailed to the address on the conversation — from the app’s identity parameters, or from the email the chat asked for — and when they open support again, the whole thread is still there.

Being plain about the shape of this: there is no in-app push notification in this version. There is no SDK to register a device token with, so a reply cannot light up your app’s badge. Email is the delivery path, and a customer who left an address always hears back.

  • The conversation persists on the device, and follows a token_id to a new one.
  • Everything the visitor sees is the shipped chat: AI answers, your help articles, your business hours.
  • In-app push notifications are not part of this version — replies arrive by email while the app is closed.
  • A native chat UI and platform SDKs are not shipped. This is a hosted page in a WebView, deliberately.
06 · Set-up

Live in four steps

Turn live chat on

Settings → Help Widget. If your website widget already chats, you are done with this step.

Copy your chat URL

The “In your mobile app” block has it, with a copy button. Claim a help-center address first if you want a branded one.

Open it in a WebView

Paste one of the recipes above into your support screen. Enable JavaScript and DOM storage.

Add identity, if you want it

Pass a token, email and name — and switch on verification with the signature when you are ready.

07 · Close neighbours

The rest of the inbox.

In-app chat is one door into the inrelay feature family — these are the ones it leans on.

Start today

Your app, with support in it.

Free to start with your own inbox — every feature, no card, never per seat.

Questions, answered.

Do I need to add a dependency to my app?
No. There is no inrelay package for iOS, Android, React Native or Flutter — you open a URL in the WebView your platform already ships. Nothing to update, and no version of ours to keep in step with yours.
What happens if I pass no parameters at all?
Chat works. The visitor is anonymous, their conversation persists on that device, and the chat asks for an email itself if your lead form is on — so a reply can still reach them.
Can someone else read a conversation if they guess a token?
With verification off, anyone holding a valid token_id can resume that conversation — which is why tokens must be long and random, and why the verification toggle exists. With it on, an unsigned token is ignored entirely.
Does the customer get a push notification when we reply?
Not in this version. Replies reach them by email while the app is closed, and the conversation is waiting when they open support again. In-app push would need an SDK, which is the thing this approach deliberately avoids.
Is in-app chat on every plan?
Yes. It is the same live chat you already have, served as a page — there is no mobile add-on and no per-conversation fee.

Start running your DMs.

Give your customers faster answers and your team their evenings back.

Desktop and mobile. Free for solo.